
Stoßrappier - Construction Part 1
Need a training weapon for smallsword? Here´s how to make your own for around 40 € material costs! Note that I´m using an old electrical blade for the pictures and that my camera sucks.
The tools of the trade

A drill with a tip of 0,5 cm diameter
A japanese-style saw (best kind of saw ever!)
A flat metal file
A half-round wood file
A Finnish knife
Sandpaper
A hammer (not in the picture)
Raw materials

A standard manual French Epee blade
An Italian handguard
A French knob
A round piece of wood around 3,5 cm in diameter and ca. 9,5 cm long (depending on your hand, the wood could be shorter and thinner, but it´s good to have some safety margin)
Duct tape
A lighter (I also use candles to safe lighter fluid)
A nut with a diameter of 1 cm
Some polymer glue
The last two are only required if you want to build the safety tip yourself and not necessary if you buy a blade with a metal safety tip or one of those rubber
things.
Optional step: Removing the tip

If you have a blade with a metal safety tip, the first thing to do is to remove it. This requires two pairs of pliers, or better one pincer and a pair of pliers like in the picture. The tip is screwed and glued, that´s why you won´t get it off by hand.

Hold the blade near the tip,possibly even closer than in the picture, with the pincers.

Grab the tip at its flat base with the pliers. It opens the same direction everything else that´s screwed on does. You need a really tight grip and you´ll need to try a few times until it starts moving.

Aaand done!
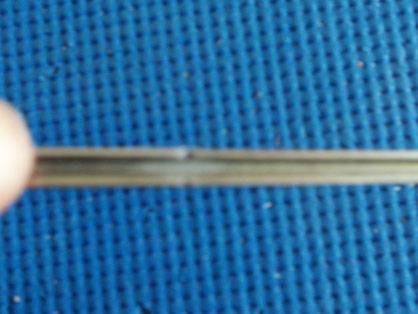
First step: Shortening the blade

Modern Epee blades are a bit longer than historical smallsword blades. In the old days, they used to measure it in spans, which is the distance between the outstretched thumb and middle finger as you can see to the left. The blade should be four times that length, which usually amounts to around 83 cm. If you have unusually large hands, you can also just use 83 cm.

Start filing away! Put one of the edges of the flat file to the metal and work at an angle.
First results: Two V-shaped indentures. (Again, sorry for the quality of the pictures!)

Turn the blade 90° and deepen one the indentures. Work both sides.

File into the back of the blade. Once this is deep enough, you can just snap it. There´s no risk involved in doing so since all sports fencing blades are designed to break clean without fragmentation.

After the snap. Don´t throw away the snapped off part yet, it´ll come in handy later.

Use the flat file to remove any edges or points, but keep the V-shape on the sides!

That´s about the shape you want.
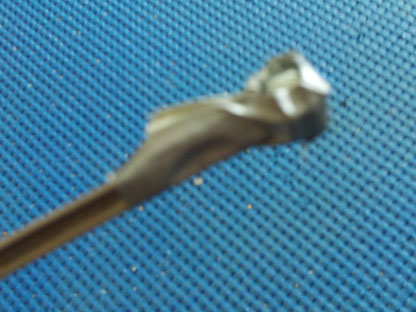
Step 2: The tip

Assuming you don´t have the premade metal safety tip, here´s what you can do:
Reduce the diameter of the blade at the angles created during shortening with the file, just so that you can put a nut loosely on it.

Give the nut a few solid whcks with the hammer so it stays on. This way, you can also make sure the end of the blade won´t protude during a thrust.

Here´s what it looks like from above. The end of the blade should not stick out.

Now it´s time for the polymer glue. You can use the cut-off part of the Epee blade to apply it.

Push the glue into the empty spaces between blade and nut from above. make sure nothing stands out.

Apply glue to the lower end of the nut from all sides, again making sure to leave no emprty spaces.

That´s how it could look. Note that there´s some additional glue on top as an additional safety barrier. Polymer glue doesn´t contract when it dries and is very shock resistant. Leave it to dry for a few hours.

Once the glue has dried, you´ll need duct tape for the wrapping. Use the knife to cut along the tape to get thinner stripes, about 1/4 of the original width.

Take a short stripe, place it over the tip and along the blade.
Wrap it around, doesn´t have to look pretty.

Once more, at 90° to the first stripe, and wrap around.

Take an even shorter stripe and wrap it around just below the nut. This one should be really tight.

Now you´ll need a long stripe.

Put one end of it on the tip at an oblique angle.

Have the cat help you. ;-)

Turning the blade, wrap around tightly, moving lower in the process.

Reverse directions and keep wrapping til you reach the top, and go down again.

That´s what it could look like when you´re done. It´s hard to see in the picture, but the tape should now overlap in an x pattern.

Now you need some fire. Hold the taped tip into the flame and keep turning. That makes the tape partially melt, partially shrink, securing a tight fit.

Note: The fumes will stink and should not be inhaled, as far as possible.
Depending on how much you melt the tape, you may want to hold in in cold water for a moment. This results practically in plastic, but requires more tape.
That´s it, the blade is now ready! Now you only need to make the handle. See part 2.